☰
👤

How to Make a St Brigid’s Cross for St Brigid’s Day
St Brigid’s Day is celebrated across Ireland to celebrate the return of Spring on the 1st of February. St. Brigid's Day is linked to the Celtic festival of Imbolc and she is our only female patron saint!
Traditionally, Irish people believed St Brigid crossed through the land and gave blessings to the crops and homes where St Brigid’s cross was displayed. Households would gather on the eve of St Brigid’s Day and make a cross from rushes to hang overnight. They would hang the cross over the door and around the home to welcome St Brigid along with items or scraps of clothing. It was believed when St Brigid passed through overnight, the clothing would then contain healing powers.
Schools and households around the country have kept the tradition of the St Brigid’s Cross.
How to make a St Brigid’s Cross:
What you need:
- Rushes, straw or
- 16 pieces of straw or paper environmentally friendly drinking straws
- 4 small rubber bands
What to do:
Here are the simple steps you can take to make your own St. Brigid’s Cross:
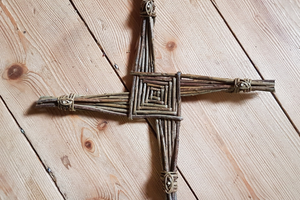
- Start by getting 16 equal pieces of straw to make your cross out of.
- Hold one piece of straw upright.
- Fold a second piece of straw in half, then wrap it around the first piece in the middle.
- Make sure the piece is wrapped tight, then rotate it, so the second piece is pointing up.
- Fold a third piece of straw in half, then wrap it around the second piece (like you did around the first piece in step 3).
- Rotate it anti-clockwise again, so the newest piece of straw is pointing up.
- Repeating what you did in step 5, take a fourth piece of straw, fold it in half, then wrap it around all the pieces of straw that are pointing up.
- Rotate it anti-clockwise once again, then repeat the previous step once again with a new piece of straw.
- Continue to follow these steps repeatedly, adding new pieces of straw. Keep going until you run out of pieces of straw.
- Using some elastic bands, wrap the pieces of straw pointing each way together, so you have four ends pointing in different directions